Friday, March 4, 2016

Arduino alternatives for learning using other Mirco Controllers

Arduino is so famous that beginners may not know that there are equivalent/alternative to Arduino using other micro controllers from other manufacturers. . In this post I am giving some information which I came across various sites. One thing I have to mention is though I used the word equivalent but I have to say it may not be exact equivalent in terms of followers or availability of libraries as the user base of Arduino is much bigger. However there is lot to learn and trying to get familiar with other products or options will be fun.

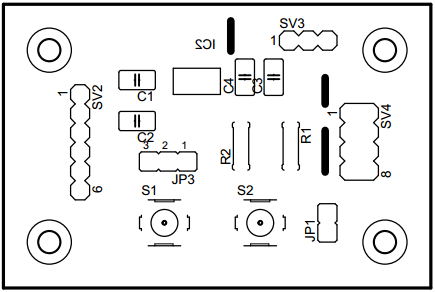
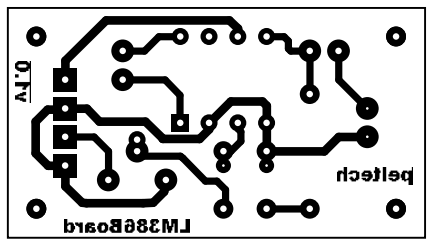
  1. Pinguino - Using Microchip PIC18F2550, PIC18F4550, PIC32MX250 and others. It is again an opensource, IDE and hardware details available at http://www.pinguino.cc/ . This IDE is written in Python and uses SDCC compiler for PIC18x devices and gcc compiler for MIPS based PIC32x controllers. As these PIC controllers has built in USB interface there is no FTDI or other USB to serial interface chip involved. So anyone can build a Pinguino easily with a PIC microcontroller mentioned above, one crystal, few capacitors, couple of resistors and required connectors.

    Screen shot of IDE


    Pinguino board (with PIC18F4550)

  2. STM32duino - These are based on STM32 controllers, IDE & forum available at https://github.com/rogerclarkmelbourne/Arduino_STM32 and http://www.stm32duino.com/ . Originally started at  http://www.leaflabs.com/about-maple/ with boards names as maple and maple mini which is since stopped further development.  The good thing about STM32duino is that it uses same Arduino IDE with additional files. So user can feel at home. Boards based on STM32 controller comparatively available at lesser cost (starting at US$5) with various features. Compiler used is gcc.

    Screen shot of IDE


    Pictures of some boards based on STM32

  3. TI Launchpad with Energia - Chip vendor Texas Instuments (TI) has launched low cost development boards called Launchpads for which Arduino like IDE called Energia is available. TI launch pads details are available at www.ti.com/launchpad and http://energia.nu/ respectively. Energia is based on Wiring and Arduino framework so Arduino users can feel at home

    Energia screen shot


    Picture of a Launch pad
  4. MBED board with online compiler - 

Sunday, March 22, 2015

ESP8266 breakout board

In my previous post, I shared my first experience with ESP8266. Further I wanted try various firmware and try building my own firmware. For this, so much cabling is not good so I set out to prepare a small breakout board which can connect one end with CP210x USB to serial board and another end with ESP-01.

The breakout board will have reset button, GPIO0 ground button, a jumper to ground GPIO0, power selection jumper, a port with 3.3V, GND and GPIO2.

Give below my progress step by step:

1. Schematic


2. PCB Layout (bottom)


3.Component layout (note the dark 3 lines are for wire jumpers)

4. Assembled board (note 3wire jumpers as it is single side I could not avoid, 117 3.3V regulator is SMD and I do not have it right now so not soldered in bottom side. Later in the input side 10uF capacitor place I put a 2pin header so I can connect to an external regulator PCB module )


5. All boards connected together

6. Working one (note : as I have not soldered 3.3V regulator, still using external regulator module)

7. With 3.3V regulator soldered (during soldering I found out, I did a mistake in AM117 footprint, now I updated schematic and board to v1.1, I did a small track repair to make my v1.0 PCB work)

8. Check github for related files at https://github.com/MohanRenganathan/ESP8266-ESP-01

Saturday, March 21, 2015

Using ESP8266

Around 6 months back I stumbled on ESP8266 while searching for low cost WiFi module. Most of the other WiFi modules costs INR 2000-3000 and adding a WiFi to embedded projects seem to be very costly proposition. So when ESP8266 came in the price range of US$ 3-5, it looked like best of the best thing to happen. But when I looked that time, the documentation was very minimal and even the available ones were in Chinese so temporarily I put my interest on hold thinking let it mature.

As I watched, whole lot of people worked on it, multiple modules came out, so may sites came out hacking it. Even the Chinese supplier started publishing source code and I felt it is right time to play around with it. So I ordered couple of modules (ESP-01, ESP-03, ESP-12) from China. The cost is starting at RMB 13 (INR 130 approx, sellers in India selling it starting from INR 500).

Got the modules in a week time and it is time to play around these modules and I am sharing my experience below. In the below picture the the modules shown are ESP-01, ESP-12 and ESP-03.


It is easy to use ESP-01 as it has headers already soldered. So I used this first to test it out.
  1. As various sites pointed out, I am going to use a USB to Serial converter to connect it to a PC.
  2. I used CP210X based USB to serial converter, fortunately the one I have is giving 3.3V logic level at RX/TX so no issue in connecting it directly to ESP-01, yes some people tried connecting 5V level (say from Arduino) but I would like to stay within spec.
  3. Looks like ESP8266 current consumption is high in the range of 70 to 100mA so need have separate 3.3V source rather than using supply provided by CP210X module (per CP210x datasheet it's built in regulator can give a max of 100mA so do not want stress it). I had a small module which will take 5V input and give 3.3V output and I used the same
  4. Next is to measure the current consumed by whole setup. For this I used small device sold in Chinese sites which can measure Voltage, Current, Power & Charge
  5. The wiring diagram
  6. Below image shows how it all looks when connected together. As seen in the picture the modules current draw varies from 40 to 90mA.


  7. ESP-01 response in a serial terminal, I used Hercules utility, Baud can be anything, I first tried 115200 and it did not work so tried 9600 and it worked. So try different values. As we type in terminal it is sent to ESP-01 and command end is sensed by CR/LF so enable CR/LF and disable Local Echo.


Sunday, October 12, 2014

LM386 Audio amplifier

It is long time since I did anything in analog circuits, so this weekend was spent in analog circuits.

I was working on creating sound from one micro controller board and wanted the sound to be audible through a loud speaker. This called for a small audio amplifier and I had LM386 (old but still useful) in the junk box, so I set out to create a small board for it.

The schematic:

The PCB design:


Printer toner transfer, etched and drilled board:
(few holes were not perfect, first time trying my new Dremel tool for PCB drilling)


Assembled board:

Saturday, October 4, 2014

From India, buying electronic components in Taobao

For my hobby projects, I buy electronic components from various online electronics shops in India. Time to time I buy components (not available or costly in local stores) from ebay.com. However last few buys from ebay.com (sellers obviously from China) did not reach me (waited for 40days).

So I was looking for other options to buy electronic components from China. Looked like Taobao is another option which I thought will explore.

Taobao is a Chinese consumer to consumer market place belonging to Alibaba group (yes the US$ 25 billion eCommerce giant). Buying from Taobao from other countries could be difficult because of language (Taobao site is in Chinese). I think this opened lot of business opportunities for others. There are so many agents in China who operate a website in English for overseas buyers and the process goes typically like
  1. You find out the items in Taobao site
  2. Share the item link in the agent web page
  3. Pay agent to buy the item along with a local courier fee
  4. Payment also includes a transaction fee for the payment platform operator say Paypal
  5. Agent buys it for you
  6. Item reaches agents warehouse
  7. Calculate weight and select shipment mode
  8. Pay service fee to agent and shipment fee
  9. Agent ships items and provides courier tracking number
Looking at various online reviews I have chosen www.yoybuy.com for my first purchase. They charge 10% service fee (US$ 5.69 min), their local courier fee around US$2.02 and the DHL shipment fee to India is around US$20 for first 500gms.

Having chosen the agent, I logged my first order for around US$20 on 22/10/2014. I most of the items reached agent's warehouse by 29/10/2014. To optimize internationl shipment charges, I placed one more order and waiting for the material arrival at agent's warehouse. 

Within a weeks time all material arrived at Yoybuy site and I selected all for shipment. At this point of time the commission of 10% order value or a min 5.x USD, shipment charges and custom clearance charges to be paid. Insurance payment also there as on option but I did not choose it. Looking at shipment mode, somehow DHL was not getting enabled it was around 20+USD so I have chosen Aramex. Aramex charges were USD9.x for first 500gram and it is very nominal. I paid all these using paypal (paypal charges some transaction fee of around 4.5%).

The same day Yoybuy shipped it and the next day I got Aramex tracking number. Being a Gulf based company, Aramex shipment first went to Dubai and from Dubai it came to Bangalore via Chennai customs. It took a week for the parcel to arrive in Bangalore. Only thing is customs charged me some 1250 INR and Aramex added some clearance charges of INR 150. (see more input in my reply below in response to a query).

Overall not bad, variety of items I got it within reasonable time. Yes there are variety of charges but I think in the end we can end getting some latest or difficult to items in less cost. Customs good be a spoiler because of the unpredictability in levying customs charges. If it is nominal say 10 to 20% actual cost then it is very good option to buy. But if customs thinks the parcel undervalued and treats it as a higher value item then the customs will be high and in the we could end up paying higher cost for the items.... 

Wednesday, October 1, 2014

Arduino Clock with control from Android phone

It is some time since I played around with Arduino. My daughter wanted me to show her something other than blinking some LED's. So I promised to build something for her which she could control from her Samsung Galaxy Tab2.

I quickly put together an Arduino, small bredboard shield, 4digit 7-segment display, DS1307 RTC chip and made it up & running. See below the clock working...


Schematic is given below

Saturday, May 10, 2014

STM32F103ZET6 - WB-RedDragon103 - Development board

I wanted to have a board with STMicro controller with all the bells and whistles. My search in ebay narrowed to http://www.ebay.com/itm/321103107512?_trksid=p2059210.m2749.l2649&ssPageName=STRK%3AMEBIDX%3AIT which is priced at US$ 65 which is very good bargain.

So I ordered it on April 13th and got in my local area post office on 5th May but with a catch. They asked me to pay a duty of Rs 2105 so the total cost become Rs 2105 + US$ 65. Still I do not regret buying it. See image below.


Will share more details as I play with it.